Shift Register
A shift register is a good to way to multiply the digital outputs on a microcontroller. By using 3 digital I/O pins you can get at a minimum 8 digital I/O pins. And on top of that by adding a second Shift Register you can turn 3 pins into 16 pins.
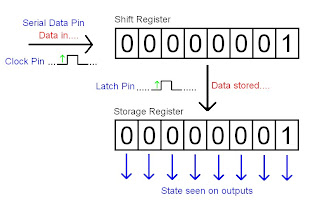
See the diagram for reference of the operation of a Shift Register. The Shift Register is aptly named because you bit by bit 'shift' the 1's and 0's into its registers. Internally the device has two registers, the Shift Register and Storage Register. You can think of the shift register as a waiting area and the storage register as the active area. You shift in your desired 1's and 0's into the shift register initially, and then once you are ready, you flip a switch and those 1's and 0's get transferred to the storage register. Whatever is in the storage register is what you can see on the external pins. Shift in a zero at a spot and the pin that is mapped to that spot will look like a ground or LOW. Shift in a one and that spot will look like a HIGH on that pin.

My Test Circuit
So back to my little LED bar graph. See picture of my test circuit below. In words, the Shift Register is connected to the Arduino by pins 5, 6 and 7. Pin 5 is connected to the Serial Data pin of the Shift Register, pin 6 the Latch pin and pin 7 the Clock pin. The 8 outputs of the Shift Register are connected through resistors to the anodes of LEDs.
So, not a terribly difficult circuit but a good way to learn the use of a Shift Register.
See my test code below......
/***************************************************************
  Single Shift Register Test Sketch
  Shift_Reg_Test.pde

  Kyle Kuepker
  31 December 2010

  A test sketch to exercise a single Shift Register to light 8 LEDs.

  Intended Hardware implementation:
  Arduino pins 5,6,7 are connected to Shift Register data,
  latch and clock pins respectively.  Each output of the Shift
  Register is connected through a resistor to the anode of an
  LED.  Shift register outputs are active HIGH for the LEDs
  (a HIGH output on a Shift Register pin will turn ON an LED).
***************************************************************/
// Data pin number for Arduino
#define data_Pin 5
// Latch pin number for Arduino
#define latch_Pin 6
// Clock pin number for Arduino
#define clock_Pin 7

//Define a delay for testing purposes
#define delay_ms 100

void setup() {
  //Setup serial test for debugging
  Serial.begin(9600);
  Serial.println("Connected");

  //Set shift register control pins to outputs on Arduino
  pinMode(latchPin, OUTPUT);
  pinMode(dataPin, OUTPUT);
  pinMode(clockPin, OUTPUT);
}

void loop() {
  // Turn on first LED
  sendByte(0b00000001);
  delay(delay_ms);
  // Turn on second LED
  sendByte(0b00000010);
  delay(delay_ms);
  // Turn on third LED
  sendByte(0b00000100);
  delay(delay_ms);
  // Turn on fourth LED
  sendByte(0b00001000);
  delay(delay_ms);
  // Turn on fifth LED
  sendByte(0b00010000);
  delay(delay_ms);
  // Turn on sixth LED
  sendByte(0b00100000);
  delay(delay_ms);
  // Turn on seventh LED
  sendByte(0b01000000);
  delay(delay_ms);
  // Turn on eighth LED
  sendByte(0b10000000);
  delay(delay_ms);
  // Turn on seventh LED
  sendByte(0b01000000);
  delay(delay_ms);
  // Turn on sixth LED
  sendByte(0b00100000);
  delay(delay_ms);
  // Turn on fifth LE
  sendByte(0b00010000);
  delay(delay_ms);
  // Turn on fourth LED
  sendByte(0b00001000);
  delay(delay_ms);
  // Turn on third LED
  sendByte(0b00000100);
  delay(delay_ms);
  // Turn on second LED
  sendByte(0b00000010);
  delay(delay_ms);
}

void sendByte(byte data){
  digitalWrite(latchPin, LOW);
  shiftOut(dataPin, clockPin, MSBFIRST, data);
  digitalWrite(latchPin, HIGH);
}